
By Kelvin Sim
Introduction
Website analytics tools such as Google Analytics (GA) are great at providing you with data can help improve your websites content, elevate user experiences and increase your conversions. As mentioned in a previous blog post – How To Use Google Tag Manager To Track Your Event Goals, setting up GA goals that reflect your business can provide you with critical information that will contribute to your Conversion Rate Optimisation (CRO) activities.
However, to gain a more comprehensive overview of how your users interact and behave on your website – try CRO tools!
What are CRO tools?
CRO tools allow you to undertake a qualitative research and retrieve insightful information regarding your online visitors in forms of visual data reports.
For example, heat maps are a visual representation of data that uses a system of colour-coding to represent values. These visual snapshots are most commonly used to understand users’ behaviour on specific web pages – this may include clicks, scrolls and mouse hovers.

(Note: There are many forms of visual data reports.)
Combining these visual data reports with website analytics tools such as GA can unravel blind spots on your website and provide you with an even more holistic understanding of your users.
Whether you have an Ecommerce business, media website or digital marketing agency, you can get valuable insights from your web page visitors with these CRO tools.
There a numerous CRO tools out there that webmasters and marketing analyst alike can use to obtain insightful user behaviour data. CRO Tools such as Hotjar merges analytics and feedback to offer their users various reports such as visitor recordings, heat maps, funnel testing, feedback polls, surveys and many more.
Here at Ignite Search, a tool that we use often is Crazy Egg. This CRO tool comes equipped with a simple user interface and navigation platform that allows the Ignite team to seamlessly run our CRO campaigns and retrieve insightful visual data reports that contribute to our CRO activities.
What is Crazy Egg
![]()
Crazy Egg is an online application that helps you to analyse user interaction for various pages of your website. With a small snippet of code you can install on some or all pages of your website, Crazy Egg will provide you with eye-tracking visuals such as Heat maps, Scroll maps, Overlay and Confetti. This helps you to understand your customers’ interests so you can boost the profit from your website.
Within the Crazy Egg platform you can retrieve the following snapshots:
- Heat map – A picture of where people clicked on your site. This lets you see what’s hot and what’s not, so you can make changes that increase conversions.
- Scroll map – The scroll map shows how far down the page people are scrolling and helps determine where visitors abandon the page.
- Overlay – When you look at the overlay report, you’ll be able to see the number of clicks on each element of your page.

- Confetti – With confetti you will be able to distinguish all the clicks you get on your site segmented by referral sources, search terms & more.


How to install Crazy Egg
- Login into your Google Tag Manager (GTM) account.
- Click on ‘Add a New Tag’.

- Click on the ‘Tag Configuration’ section. (Or, click on the pencil icon.)

- Choose ‘Crazy Egg’.

- Copy the account number at the top of the Google Tag Manager Instructions page.

- Enter your Crazy Egg account number into the ‘Account Number’ field.


(Note: The Snapshot Name field under ‘Advanced Options’ must be left blank.) - Click on the ‘Triggering’ area. Select ‘All Pages’ for the trigger.

- Click on ‘Save’.

- Click on ‘Submit’ at the upper right-hand side of the page.

- Click on ‘Publish’.
(Note: Wait a few minutes and you can start to use Crazy Egg.)


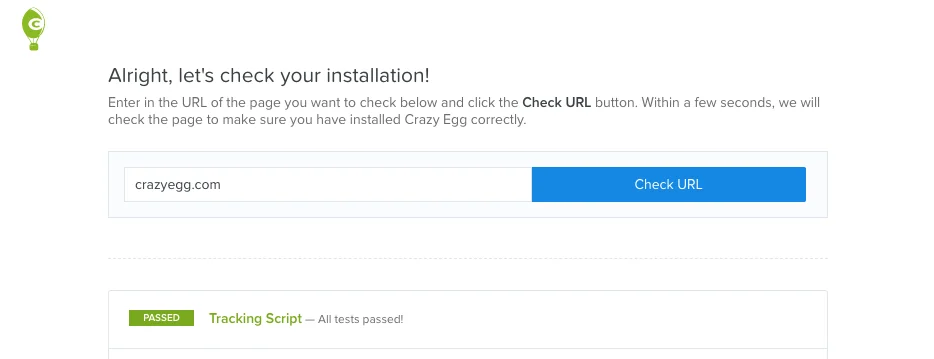
You can also check to see if you’ve installed Crazy Egg correctly via the Check Installation Tool
That’s it, you’re all done! Now let’s set up a Crazy Egg Snapshot.
How to set up a Crazy Egg Snapshot
- Create a Snapshot
(a.) Click on the ‘+ Add new’ button in the top right-hand corner of your dashboard and then select ‘Snapshot’ from the drop-down list.
(b.) On your Home dashboard, select ‘Create a new Snapshot’ under your Snapshots overview.

(c.) On your Snapshots dashboard, you can either select ‘+ Create Snapshot’ or click on the ‘+ Add new’ button in the top right-hand corner of your dashboard and then select ‘Snapshot’ from the drop-down menu.

- Choose Your Snapshot (Multiple or Single)

(Note: If you opt for a single Snapshot, most of the steps will be the same as when you choose multiple Snapshots with a couple of exceptions.) - Choose your Settings

Take a screenshot of the: What device view the Snapshot will take.For example, if you choose the desktop image, your Snapshot will capture a screenshot of your page as it looks viewed on a desktop.
(Note: This is an important step if your website looks drastically different on various devices.)
Track Traffic from: Under ‘Track Traffic From’, you can choose either the same device type you did for the screenshot capture or select a combination of different devices.
(Note: This is default to all three devices)
Schedule: You can edit when you want your snapshot to start and end.
- Final Review

Review your Snapshots before activating them. If you want to make any changes, click on the ‘Back’ button. - Click ‘Create #Snapshot’


Conclusion
Retrieving these Crazy Egg Snapshots will provide you with a more comprehensive overview of your website’s visitors and how they interact with specific web page elements. When you combine these Snapshots with web analytics data you will be able to implement a more effective CRO strategy that will increase your conversion rates and ultimate grow your business.